How to add Contacts in Chatjy App ?

How to add up to 2,00,000 contacts to Chatjy?

You may quickly import up to 2,00,000 user contacts by creating a.csv file using the Chatjy marketing platform, which uses the WhatsApp Business API. You can import useful data like tags & the lead’s source in addition to the names & phone numbers of all contacts.

How to import Contacts to Chatjy Dashboard ?

Create Tags & Attributes
Create Tags & Attributes with the same name in the Chatjy App in order to add contacts to Chatjy with Tags & Attributes like email, source, etc.

Go to Manage and create Tags and attributes that exactly match the information you will include in your contacts.csv file.
Go to Contacts Page & click 'Import' Button
Select the “Import” button, which is next to the “Export” option in the top right corner of the Contacts Page.
Upload .csv File in this FORMAT
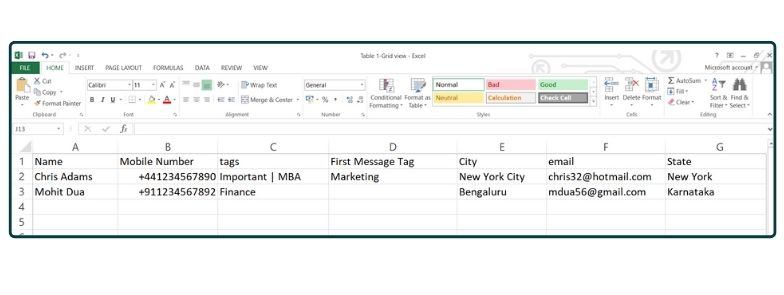
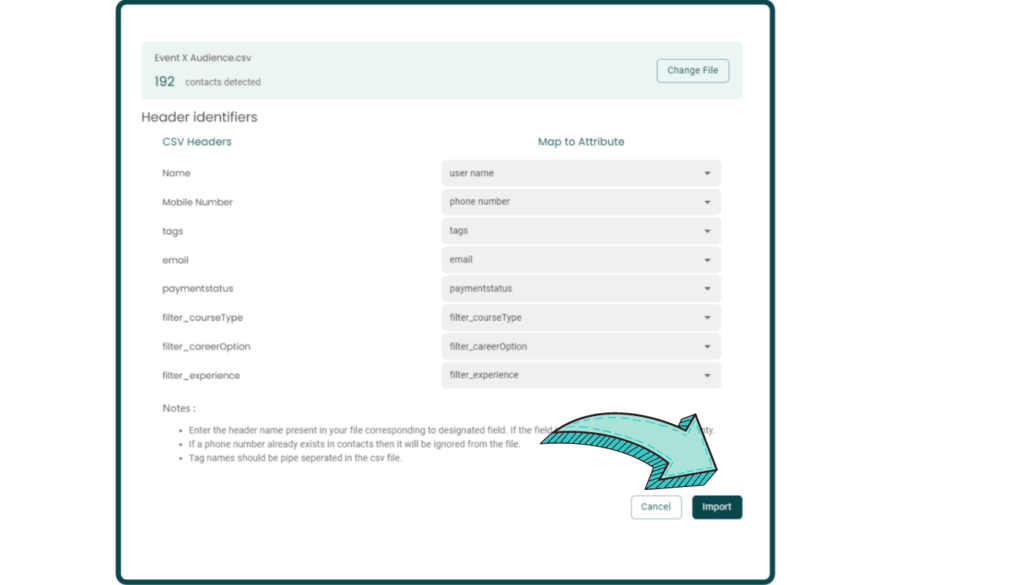
Please use the left-hand image above to reference the CSV file’s standard format. The fact that Mohit Dua’s First Message Tag field is empty merely implies that, following import, this field will be empty as well on the contacts page.

The Custom Attributes are the headers City, email, and State. Additionally, the mobile number is formatted with a “+” symbol and the country code. Other fields that are not included in the CSV file will automatically be updated or left empty depending on the field’s properties.

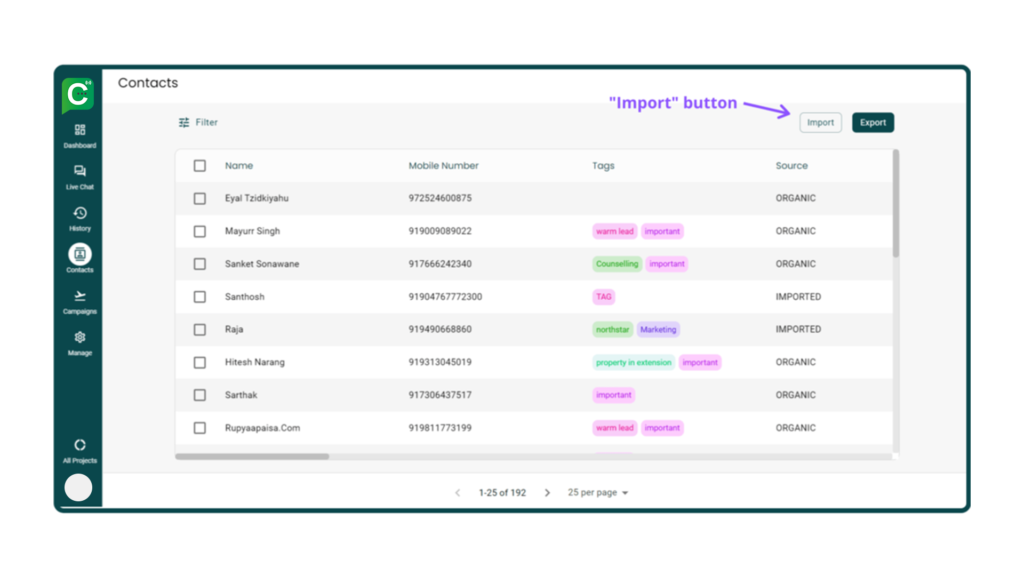
Please see the FAQ section below for further information.
Upload your Contacts in a .csv File
After pressing the Import button, a window will open in which you must upload the contacts file. To upload a file, click “Upload File” and choose a file on your computer. The file should be formatted as follows. csv

Make sure to download the file in.csv MS-DOS format for Excel.
Map the attributes in line with Column Entries
You must map the attributes to the column entries of the.csv file after uploading the necessary file.

The column headings of the.csv file would be on the left side. The properties of your Chatjy Contacts Page would be on the right. As an illustration, “Name” will be mapped to “user name,” “Mobile Number” to “phone number,” and so on.
Hit the Import Button
Once each entry has been mapped, the last step is to click the “Import” button at the bottom right of the screen, which will import all of your users’ contact information.
View Contact History
You may check to see if each of your contacts was successfully imported by viewing the Contact History.

To examine a list of all the contacts added to the AiSensy App, click the icon labelled “View History.”
Download Contacts Added, updated or failed list
Clicking the “View History” button will load a window as shown in the image on the left. There you can see the number of contacts added, contacts updated or contacts that could not be added.

The Contacts that are already added and you have again added them with updated attributes will show under ‘Contacts Updated’. For updated contacts, chats won’t be deleted!

To know the reason for message failure, download the report & view the reason for failure.